创建项目
首先通过vite创建vue-ts项目,有两种方式
1 | # 自行通过交互选择 vue-ts |
然后安装node的ts提示
1 | npm install @types/node --save-dev |
配置文件
vite.config.ts
vite的配置文件,配置和功能类似于vue.config.js,详见vite配置文件
1 | /** |
tsconfig.json
该配置文件已经自动生成,根据需要做出部分更改,添加如下部分
- baseUrl: ts监管当前目录
- paths - ‘@/*’: ts对于路径别名
@给出代码提示 - exclude: ts监控目标排除
node_modules部分
1 | { |
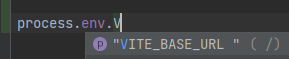
env.d.ts
用于给以VITE_为前缀的自定义全局变量添加typescript自动提示的声明文件
文件内容如下
1 | interface ImportMetaEnv { |
安装常用插件或库
scss & less
vite已经内部支持了scss和less,无需再安装sass-loader等,若需要使用仅安装sass或less即可
1 | # sass |
element-plus
首先安装 element-plus 本体和两款自动导入插件unplugin-vue-components和unplugin-auto-import
1 | npm i element-plus |
修改vite.config.ts,配置自动导入,配置后无须再手动引入即可直接在页面中使用,详见element-plus官网自动导入
1 | import {defineConfig} from 'vite' |
vue-router
参考vue-router官方文档, 目前新版vue-router为v4.x,安装先
1 | npm i vue-router@4 |
新建router->index.ts文件,设置基础配置
1 | /** |
新版本
vue-router中,使用/:catchAll(.*)来匹配所有路由,不再像以前那样使用*
且使用createWebHistory()来创建历史模式路由,同样对应的有createWebHashHistory()创建哈希模式路由
main.js文件内做如下处理
1 | import {createApp} from 'vue' |
vuex
参考vuex官方文档, 目前新版vue-router为v4.x,安装先
1 | npm i vuex@next |
新建store->modules->app->app.ts,设置自定义app模块
1 | /** |
新建store->getters.ts,编写getters
1 | /** |
新建store->index.ts,编写vuex基本配置
1 | import {createStore} from 'vuex' |
main.js文件内做如下处理
1 | import {createApp} from 'vue' |
前台页面通过useStorehook获取store对象
1 | import {useStore} from 'vuex' |
其他要点
vue3的deep穿透样式
vue3的此写法修改为如下,几种均可
1 | &::v-deep(.demo) {} |
使用$refs
首先模板代码为
1 | <audio ref="bgmAudio" src="xxx.mp3" preload="auto" loop="loop"></audio> |
typescript中,引入所需的方法和其ts类型
1 | import {ref, Ref} from "vue" |
setup中以如下方式获取
1 | const bgmAudio: Ref<HTMLMediaElement | null> = ref(null) |
props的类型
使用PropType来为组件的props定义类型
1 | // 引入 |
自定义全局变量
首先在main.ts中定义,vue3中使用globalProperties来挂载全局对象
1 | app.config.globalProperties.$http = axios |
在页面中使用getCurrentInstance方法来获取全局对象所挂载的proxy,如下
1 | import {AxiosInstance} from 'axios' |
全局引入css文件
通常情况下我们会需要全局引入诸如 _mixins.scss 或 _variables.scss 等样式文件,若仅只是在入口文件内引入,会因为加载顺序问题导致找不到相关变量报错。
在 vite.config.js 中进行如下配置解决:
1 | export default defineConfig({ |
在打包过程中,每一个文件加载时均会执行 additionalData 方法,该方法接受两个参数,并返回处理后的文件内容。两个参数分别为:
- content:当前文件的内容
- loaderContext:当前文件的文件名
通过在每个文件内容的前面添加引入文件语句来达成全局引入的效果。这在开发环境下是没有问题的,但在打包时会因为重复加载而报错,即加载自身时引入自身,因此需要做额外操作进行排除。
1 | export default defineConfig({ |
打包后assets图片路径错误不显示
参考文章:vue3+vite assets动态引入图片的几种方式
对于assets里的静态文件,vite不再支持require方式在img标签上获取图片,因为require是webpack的方法,也不再支持css中url(~@)的方式获取。
vite改为直接使用绝对路径,默认会在打包后给图片加上哈希值。见vite官网解释。
img标签中
1 | <img src="/src/assets/images/xxx.png" alt/> |
css中
1 | .selector { |
但这种方式并不会对使用v-bind(即:src=imageSrc)动态定义的src进行解析,同理例如element-plus的el-image这种非原生的封装组件也不会解析。这就造成了开发环境一切正常到了生产环境却各种猫腻。
解决方案
一种解决办法,和webpack一样的,就是直接把静态文件丢到public文件夹,不会进行打包,但至少我不喜欢这样。
经过翻看官网文档,找到了解决办法:静态资源处理 | 将资源引入为 URL
当前我的图片文件在src/assets/images下,在文件 src/utils/useAssets.ts内写入如下代码
1 | export const getAssetsUrl = (url: string) => { |
使用案例:
1 | import {getAssetsUrl} from "@/utils/useAssets" |
template模板中(允许动态生成路径)
1 | <img :src="getAssetsFile(`common/diamond_${d_type}.png`)" alt="ERROR" draggable="false"> |
使用vue-router时打包后部分资源路径问题
参考文章:关于vite build后访问报错
在使用vue-router时,跳转到复杂路径(嵌套路由)后会出现css和图片文件路径错误无法正常显示问题,此时即使使用了上面提到的getAssetsUrl方法也无济于事。且在嵌套路由页面直接刷新会出现白屏问题,提示如下错误
1 | Failed to load module script: Expected a JavaScript module script but the server responded with a MIME type of "text/html". Strict MIME type checking is enforced for module scripts per HTML spec. |
经过查找资料以及官网文档得知,问题主要出在vite.config.ts的base属性上。vite配置-base
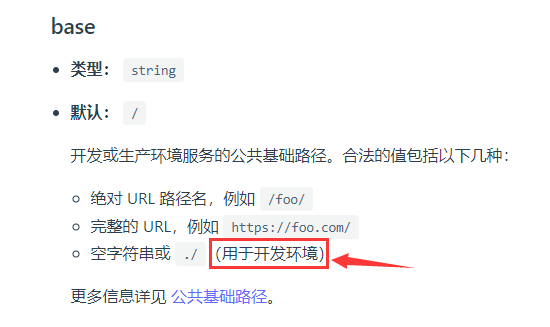
这里的这个base属性,在开发环境下可以是./,但在生产环境下需要为具体路径或/。因此需要针对不同的模式配置不同的base属性值。
根据环境变量配置vue.config.ts
有些时候我们需要根据不同的环境给vue.config.ts的属性配置不同的值,如上面刚刚提到的部分。而在vue,config.ts中是无法使用import.meta.env.VITE_**的,怎么解决呢。
vite提供了loadEnv这一方法来获取env,使用起来需要对之前vite.config.ts的定义方式做一些改装,如下
1 | import {ConfigEnv, defineConfig, loadEnv} from 'vite' |
使用__dirname报错
在 Vite3.x 版本对 resolve - alias 进行别名设置时,使用 __dirname 定位当前目录时报出了如下错误:
1 | __dirname is not defined in ES module scope |
这是由于此时 package.json 中的 type 属性值为 module,代表现在使用的模块化方式为 ESmodule。
而 __dirname, __filename, module, require, exports 这五个为 commonJs 中的内置模块,并不存在于 ESmodule 中。
而 ESmodule 对于 __dirname 的实现方式为如下写法:
1 | import path from "path"; |
打包时ts屏蔽node_modules
默认打包时typescript会对node_modules进行检查,可能会出现一些类型错误导致打包失败,经测试在tsconfig.json配置了exclude也无效。
需要在package.json中修改一下build的script命令,新增一个参数--skipLibCheck
1 | { |
打包后vue-router失效
打包后router-view无法正常加载组件,白屏。
这个大概率是由于路由配置中内未使用按需导入组件所致,修改方法如下
1 | component: import('@/view/home/index.vue') |
vite打包时报出charset相关警告
vite打包时报出以下警告,虽然不影响使用,但看上去很碍事
1 | [WARNING] "@charset" must be the first rule in the file |
这里需要修改vite.config.ts文件,删除@charset,如下
1 | export default ({mode}: ConfigEnv) => defineConfig({ |